Quantcast
Channel: Accurate Shooter » Gear Reviews
Viewing all 19 articles
Browse latest View live

New Benchrest Rig from Argentina

$
0
0

Our friend Pascal Fischbach from France offered us a sneak peak at the final production version of a new benchrest rig from Argentina. Pascal reports: “I’ll be in Buenos Aires soon and will meet Carlito Gonzales, maker of the CG M1 Thunderbolt benchrest rifle that performed so well at 2010 Supershoot and WBC10 last August in the hands of Dr. Cris Rando.” Pascal has ordered one of these rifles for the 2013 benchrest season. If you want more information about the CG M1 action or complete rifle, contact Pascal through his Facebook Page.

Gonzales Benchrest Action Thunderbolt CG M1

Gonzales Benchrest Action Thunderbolt CG M1

Gonzales Benchrest Action Thunderbolt CG M1

Pascal tell us: “The CG M1 action is a short, tight but smooth 3-Lug, Right Bolt, Left Port, Right Eject model. The receiver features a special 66mm-long tenon with threads in the center area and two bearing-centering areas on each side of the threads. Any gunsmith will be able to chamber additional barrels with the data and tools provided. This action offers strength and rigidity to enhance both accuracy and longevity. Carlito’s trigger is excellent — I recommend keeping it. The complete rifle will feature special quality rings that mate to the top of the receiver. Barrels can be chambered with your custom reamer or with CG’s conventional 6PPC reamer or even a PPC-AI chamber design (PT&G) that Carlitos realy likes. Price for the complete rifle will be very competitive.”

Gonzales Benchrest Action Thunderbolt CG M1

One reason this rifle performs so well is the innovative stock design. The fore-arm is very low profile in the front. At the back of the stock, an exaggerated Vee profile aids tracking and reduces vibration. Pascal says the stock tracks very straight for the first couple of inches during recoil, and the marked Vee in the rear makes it ride on the sides of the bag ears, not the bottom stitching. This helps quell vibration and improve damping. The carbon construction makes the stock “stout and stiff”.

Gonzales Benchrest Action Long-Range CG Gonzales Benchrest Action Long-Range CG
The fluted 3-Lug Bolt is extremely well-machined. The tang on the 2012 version has been shortened for weight reasons. There’s still plenty of bedding area on the main body.

Super-Sized Action Offered for Long-Range Rifles
For you long-range shooters, Carlitos Gonzales has also crafted a larger 600/1000m version of the CG M1 designed for bigger cartridges used in long-range competition. We don’t have any specifics on price or delivery date, but the action looks nice. The extended front section should provide excellent support for long, heavy barrels.

Gonzales Benchrest Action Long-Range CG

Gonzales Benchrest Action Long-Range CG


New Wheel-Drive Concentricity Gauge

$
0
0

Talented tool-maker Curt Knitt has designed a better mousetrap — a new Concentricity Gauge that makes it easier than ever to get fast, repeatable results when measuring case and bullet run-out (aka “eccentricity”). The breakthrough design feature is the large-diameter wheel which spins the case. With most other concentricity gauges you must rotate the case with your finger(s). Anyone who has tried this knows that it is difficult to get a full, 360° rotation of the case without disturbing the indicator. Typically you can get two-thirds of a rotation or so, but then you have to reposition your finger to complete the rotation. Moving your finger often causes the case to jiggle or move slightly, and more often than not, the dial indicator jumps a bit, interrupting your measurement. Been there, done that.

Accuracy One Concentricity Gauge

Drive Wheel Smoothly Spins Cases for Fast, Error-Free Readouts
With the new Accuracy One Concentricity Gauge from CTK Precision, the rubber-rimmed drive wheel has a much larger diameter than any cartridge case (7:1 diameter ratio on magnums). So, when you rotate the drive wheel just a half-turn or so (using knurled knob on the wheel axis), you can easily and smoothly turn the cartridge three (or more) full rotations. The drive wheel maintains a constant, even load on the case, so the case doesn’t wobble and the dial indicator gives a continuous, un-interrupted read-out. What’s more, clever cartridge support design geometry pulls the case back against the rim stop as you engage the drive wheel. This holds the case in position laterally during measurement. Morever, this allows very fast one-handed operation. You don’t have to hold the case down with your fingers while maintaining side force against the case rim stop.

Watch Video Showing Concentricity Gauge Used with Small and Large Cartridges

Accuracy One Concentricity Gauge
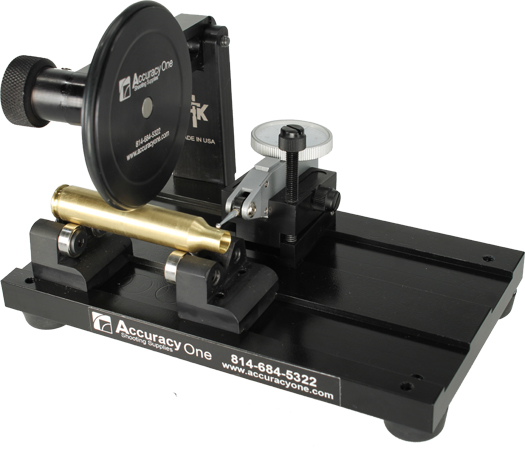
The Accuracy One Concentricity Gauge works with the full range of cartridges — everything from .22LR to .50 BMG. Adjusting the tool for different-length cases is incredibly easy, because the roller blocks (case supports) are held in place by magnets. You just slide the blocks to the desired position — no tools needed! The indicator stand is also held by magnets so it can slide to any position you want along the case body or bullet. And, the indicator can be moved to the front rail and rotated 90°. This way you can measure on the inside of the case neck.

Does this new design really work? Absolutely — it works brilliantly and it’s FAST. Watch the video and see for yourself. We could do two-rotation (720°) measurements on cases in a third the time it takes to do a one-rotation gauging operation with other tools. And the actual measuring operation can be done one-handed, leaving your free hand to pic up the next case (or bullet) to be measured. And yes, this tool can also measure bullet concentricity — measured from tip, ogive, bearing surface, and/or boatail.

Accuracy One Concentricity Gauge

1. Directional Drive Wheel pushes the cartridge or bullet into the stop for accurate, repeatable readings with equal pressure. The replaceable rubber drive ring will not harm cartridges or bullets.

2. Two-position bullet and cartridge stop.

3. Precision ball bearings provide friction-free movement.

4. Heavy steel base with E-coat finish and bolt-on rubber feet.

5. Indicator stand and roller blocks ride in machined slots and are held in place by N42 Neodymium magnets. This allows rapid, smooth, tool-free adjustments.

6. Indicator stand can be place in front OR rear machined slots. This allows for both internal and external measurements.

7. Fine-Adjustment Horizontal Indicator Stand allows very precise indicator angle/load adjustments.

8. Indicator Stand will accept horizontal indicators that are .350″ wide or narrower, and are 1.75″ to 2.25″ from the indicator contact point to the center of the main body.

9. Adjustable mechanical arm stop holds the arm up for one-handed operation.

10. Precision Drive Wheel has a 13:1 ratio for .22 rimfire, 7:1 for magnums, and 3.7:1 for 50BMG.

11. Concentricity Gauge accepts cartridges from .22LR rimfire to .50 BMG.

The Accuracy One Concentricity Gauge is available from BulletTipping.com. Price for the unit, complete with quality horizontal indicator, is $325.00. Price, without indicator, is $280.00. The initial run of Concentricity Gauges is now in final production. Gauge sets should hit the market in 4 to 6 weeks. To place an advance order, fill out the PDF Order Form, or call (814) 684-5322. To learn more about setting up and using this new tool, read the Concentricity Gauge Instructions, and watch the video above.

Radical F-TR Stock with Integral Bipod

$
0
0

Wow. If James Bond shot F-TR, we think this is what he might use. You’re looking at the radical new Steve Jennings stock for F-TR competition. This skeletonized stock is crafted to fit the Barnard action. As you can see, there is no conventional fore-arm. Instead a carbon fiber tube extends forward of the action. At the front end of the tube, a fixture hold the beefy, forward-angled, girder-style bipod legs. These legs adjust to two heights, for prone or bench shooting. Large Delrin cylinders at the bottom of the legs provide stability and help resist bipod hop. Cost of the Jennings stock, including bipod legs and bag-rider assembly, is $861.00 at Chesebro Rifles.

Chesebro Rifles Steve Jennings F-TR stock

Chesebro Rifles Steve Jennings F-TR stock

The rear bag-rider, which adjusts for height, is also carried by a carbon-fiber tube that runs from the bottom of the pistol grip back to the buttplate. The bag-rider is attached via an eccentric fixture. This way, as you spin it in and out, the vertical position changes. This allows you to get the elevation centered -up on the target, but this system is not designed for fast changes “on the fly”. Small changes in elevation are made by squeezing the bag.

The tube at the top of the buttplate looks like a skeleton cheekpiece. That is not its function however. That horizontal tube is there for balance and tuning. Jennings found that the gun shoots better with this metal tube on the buttplate — it helps balance the center of mass around the bore axis.

Chesebro Rifles Steve Jennings F-TR stock

Chesebro Rifles Steve Jennings F-TR stockMark Chesebro also offers a complete rifle built around the new Jennings stock. Built with a Barnard Action, Trueflite (NZ) barrel, and Barnard trigger, a complete Jennings F-TR rifle costs $2500.00. For more information on the Steve Jennings F-TR stock, or complete rifles built with this stock, visit ChesebroRifles.com or call (805) 280-5311. We hope to get our hands on one of these rigs for testing very soon!

Field Report by Dave White — This Gun Shoots!

Forum member Dave White has lots of trigger-time with the new Jennings stock. Dave reports that it performs as promised. Dave says:

“I have been shooting one of the early prototypes of this Jennings stock for more than a year. This replaces a $2000 piece of AA Claro with adjustable buttplate, cheek-piece, etc. That is now a safe queen.

Makes Weight — First, many guys have asked about weight. I can tell you that the Jennings rig, set up with my Barnard P action, topped by a Nightforce NXS 5-22×50, will make the FT-R weight limit.

Impressive Accuracy — I have about 600 rounds down-range with it and have seen performance that I could not get with the Palma stock on a Sinclair bipod. I have shot several five-shot groups at 300 yards with all shots in a cloverleaf. Hopefully, next year I will have more 1000-yard range time with the rig.

Steve has eliminated the issue of bedding (though my stock was modified to accept the Warner recoil lug), and that steel bar where one would normally expect a cheekpiece is a very critical component with keeping the center of mass as close to the bore centerline as possible. Shooting very close to free recoil you don’t get your cheek thumped, though I do find a piece of moleskin on that steel is kinder to the skin on a summer day in Utah.

Good Tracking — Also note that the forward rake of the bipod provides a huge footprint for distribution of mass, and this thing tracks backward like it is on a rail.

As to various comments on asthetics, you could say the same thing about modern art or almost any product design, or building since the days of Mies Van Der Rohe. However, the Bauhaus theory of form follows function works! I predict this stock will be showing up in the F-Class winner’s circles, and you can take that to the bank.”

EDITOR’s COMMENT: Now it would be great if Seb Lambang’s joystick bipod head could somehow be adapted to this rig, with the joystick running under the carbon fiber “fore-end”, but still using the forward-angled Jennings girder-style legs and oversize “Coke-Can” bipod feet. That could definitely be a James Bond-worthy F-TR rig.

Lee Classic Cast Iron Breech-Lock Press

$
0
0

The Lee Classic Cast “O”-style press has always been an excellent value — it works as well as some other presses costing twice as much. And now Lee has improved on its Classic Cast Press design by adding a breech-lock fitting in the top. This allows you to swap dies in and out in seconds, once your dies are equipped with breech-lock quick-change bushings. The Lee Classic Cast Breech Lock press is available for under $100.00. That makes it a bargain compared to other heavy-duty single-stage presses. Midsouth Shooters Supply offers this press (item #006-90999) for $92.14, while Natchez Shooters Supplies sells the press (item #LEE90999) for $93.99.

Lee Classic Cast Breech Lock Press

Lee Classic Cast Breech Lock PressBreech-Lock System Allows Fast Die Exchanges
With the Lee Breech-Lock Press system, the die drops straight in from the top. Then, with a quick 1/6th (60°) turn, the die locks firmly in place (like the breech on an artillery canon). The interrupted three-start thread assures dies return and lock into the exact same position each time. Bushings cost $7.04 each at Midsouth. If you prefer, you can leave a bushing in the press, and screw your dies in normally. But consider that it normally takes a dozen or more turns to screw in a normally threaded die. The Breech-lock system is way faster.

The Lee Classic Cast press features a strong, cast-iron frame and all-steel linkage. The large 1 1/8″-diameter ram is guided by over twelve square inches of ram bearing surface. We like the fact that you can mount the handle on either side, and adjust handle angle and length. As Lee explains: “The start and stop position is adjustable with a 48-tooth, ratchet-type handle clamp. In addition, the handle length is completely adjustable. Shorten [it] when you’re loading handgun and short rifle cases.”

Lock-Ring Eliminator Quick-Change Bushings
With Lee’s basic quick-lock bushings, you control vertical die position with the normal locking ring that seats against the top of the bushing. That works fine, but Lee also offers a handy Lock-Ring Eliminator Bushing (Lee SKU 90063). This clever design combines bushing and lock-ring into a single part. The Eliminator is turned from a solid piece of steel and the lock ring is integrated into the design of the part. With the Eliminator you’ll get the most repeatable and precise die positioning because lock ring and bushing are all one piece. Moreover, some guys say the Eliminator Bushings are easier to grab and remove than the standard Lee Breech-Lock Bushings.

Lee Classic Cast Breech Lock Press

Press owners have praised their Lee Classic Cast Breech-Lock units. Here are reports from two MidwayUSA customers:

Five Stars: Perfect single stage press. Loads accurately 6mm BR and 308 Win for competition. Large clearance is also great for my 460 Wby and 30-378 Wby. Pistol rounds in 44 mag and 45 ACP also load easy. The press has a lot of leverage for full-length rifle case sizing. Nice primer disposal system. Lowest price for its class. This unit beats my Lyman press by several miles…. ” — J. Davidson, California

Five Stars: I waited until Lee would bring out their breech-lock system in classic cast design. This thing is outstanding and better than my old RCBS partner press. Once you get the sweet setting of the die, lock it in place and next time you load, you need not fumble to find the best setting. Breech lock is the key. I choose this press over Hornady, due to all-steel construction. I load a lot of .308 Win and .223 Rem for my ARs and this requires full-length sizing. Lee meets the challenge with no flex and excellent ram/die fit and alignment. Another nice feature is that the breech-lock inserts have a lock preventing [them] from unlocking. [T]he spent primer disposal is perfect vs. RCBS where primers can miss the primer catcher. The handle can also be placed left or right as needed and shortened for small cases or pistol to reduce the handle travel. I don’t see how you can get a better press for the price.” — E. Stanley, Rockford, IL

Sure Feed Vertical-Feed Ammo Caddies

$
0
0

Tim Sellars of Fort Worth, Texas makes some of the slickest ammo caddies you’ll find anywhere. These vertical-feed caddies work well and let you shoot very fast from the bench. Tim can customize the height to fit your rifle and rest elevation. Noted gunsmith Thomas ‘Speedy’ Gonzalez reports: “Here’s the new double-stack Sure Feed made by Tim Sellars. This is one he made for me for my PPC. Each column holds 10 rounds plus five additional holes on the side for sighters or for holding a different test load. Tim makes these for all calibers and work great if you need to dump rounds down-range fast. Each consecutive round slides out and goes directly into the chamber without having to orient it into the correct position.” [Photos courtesy Speedy Gonzalez.]

Sellars Sure Feed Ammo Caddy Double Stack

To order a Sure Feed Cartridge Caddy (either the original single-stack or the new double-stack model), send email to sel248 [at] aol.com, or call Tim at 817-581-7665, from 10:00 am to 5:00 pm. Speedy adds: “Tim is very accommodating and will build just about whatever [size caddy] you want.” Single-column caddies are $85.00 (short) and $95.00 (tall). Call for prices on the double-stack models.

Sure Feed Ammo Caddy

New Flex-Arm for Sure Feed Ammo Caddies
No sooner had we revealed Tim’s double-stack ammo caddy, than we got a call from Tim saying that he was developing a new flex-arm support for his gravity-fed ammo caddies. The advantage of the flex arm is that it allows the vertical position of the caddy to be adjusted for different guns (or different shooter positions). In addition, the arm raises the caddy up off the bench, clearing space for the operation of a joystick on a coaxial front rest.

Tim explains: “At the IBS 1000-yard nationals in West Virginia this year I had a lot of requests for a flex-arm type caddy. Here’s the first prototype — the paint just dried this morning. It works great especially for the joy-stick type rest. This opens up space for the arm movement. The example in the photo has a bracket attaching the flex-arm to the rest. I can fabricate any mount specified. I also plan to offer a magnetic base for the caddy flex-arm for use with ferrous metal front rests.”

Sure Feed Ammo Caddy Flex Arm

Tim hasn’t announced a price for the flex-arm option yet: “The price is still being worked out. I will announce it after some anodizing and aluminum estimates come in. Production should start early January next year”. For more info on Sure Feed Ammo Caddies contact Tim:

Sure Feed Ammo Caddies (Tim Sellars)
4704 Redondo Street
North Richland Hills, TX 76180
Phone: (817) 581-7665 (cell)
eMail: sel248 [at] aol.com

SEB MAX Coaxial Front Rest — Field Test

$
0
0

“It’s a keeper” — that’s what Sam Hall, 4-time IBS 600-yard Shooter of the Year, told us after he test-drove the new SEB MAX coaxial front rest. Sam field-tested the new SEB MAX with his competition benchrest rifles, with a variety of forearm widths from three inches to eight inches, and weights from 17 to 61 pounds.

Did Sam like the SEB MAX? He did indeed — in fact he was so impressed with the MAX rest that he is selling his current front rest and he will be using the SEB MAX for both LG and HG matches.

SEB Coaxial MAX Rest Sam Hall

In designing the SEB MAX rest, Sebastian (“Seb”) Lambang set out to build a rest that would handle true heavy guns up to 45kg and also adapt to lighter rifles with a variety of forearm widths. This was quite a challenge, but he pulled it off. The SEB MAX quickly adapts to fit narrow, medium, and wide forearms, with a simple adjustment of the side plates on the three-piece front bag. You can change from 3″ to 5″ to 8″ width in seconds. If you prefer a conventional one-piece front sand-bag, SEB offers one-piece bags sized to fit various forearm widths from 2.5″ to 8″.

SEB Coaxial MAX Rest Sam Hall

The SEB MAX also adapts to different rifle weights through the use of a front counter-weight for the heavy big boomers. With a standard 17-lb Light Gun, you can run the MAX with no counterweight. The joystick control movement is very smooth and with the internal springs tuned right, you can shoot with your hand off the joystick. When you want to switch to a true Heavy Gun, simply attach the counterweight arm to the front of the gun. SEB can supply custom counter-weight “donuts” tuned to your specific Heavy Gun. Sam Hall reviews the features of the SEB MAX in the video below.

Watch SEB MAX Video Review (Part 1 — Light Gun)

Does the SEB MAX retain its smooth movement even with a true Heavy Gun on the front bags? Absolutely. Sam reports that “When shooting my 61-pounder, with the counter-weight in place, the joystick movement is smooth and predictable — it feels just like the Light Gun”.

To prove how well the counter-balancer works with a true Heavy Gun, Sam put his 61-lb Maxi-Tracker on the SEB MAX, attached the appropriate counterweight, and then shot a group at 600 yards without touching the joystick during a four-shot string. To Sam’s amazement, the gun produced a 4-shot group under 1.5″. Sam says: “That was in mid-day with some mirage. That’s about the best this gun can do in those conditions. It was impressive to be able to run a string with a 61-pounder and not touch the joystick.” You can see this in the Part 2 Video below.

Watch SEB MAX Video Review (Part 2 — Heavy Gun)

Superior Build Quality, Unique Versatility, and Outstanding Performance
Sam had high praise for the workmanship, fit, and finish of the SEB MAX: “This rest is a work of art. I’m not easily impressed by most products, but this is one fine machine.” Sam added that the SEB MAX is not just pretty — everything functions very well: “The sideplates have quick-release handles so you can change widths quickly. The course elevation control is very smooth and easy to use. With the course elevation locked, there is plenty of vertical travel (elevation) and plenty of side-to-side travel with just the joystick.” Sam was also impressed with how well the 61-pounder tracked on the SEB MAX: “I’ve been playing with it… and the gun seems to track perfect.”

SEB Coaxial MAX Rest Sam Hall

SEB Coaxial MAX Rest Sam Hall

SEB Coaxial MAX Rest Sam Hall

SEB Coaxial MAX Rest Sam Hall

Sam also praised the micro-fiber fabric SEB uses for both the three-piece and conventional one-piece front bags: “This micro-fiber is great. You don’t need to use any silicon or powder or anything to slick it up, yet the forearm slides on it better than anything I’ve ever seen.”

Sam likes the modular construction of the SEB MAX. Sam found that, when he was just shooting a Light Gun, he could remove the rear foot, making the rest easier to move around. Like the SEB NEO rest, the MAX rest breaks down into flat modules so it packs more compactly for shipping.

SEB MAX rests are currently in the final stages of production. Price for the USA market has not yet been set. You can get on the pre-order waiting list by contacting Ernie Bishop in Gillette, Wyoming. Call (307) 257-7431, or email ernieemily [at] yahoo.com. For other markets consult dealer list on www.SebCoax.com.

Weight: The MAX weighs approximately 18.4 kg (40.5 lbs) without the counter-weight, with bags empty. Sam’s rest with full bags and counter-weight is about 45 pounds.

Rest Size: Side to side footprint (center to center of leveling screws) is approximately 13.78″. Dimension from back to front is about 14.17″.

SEB Coaxial MAX Rest Sam Hall

21st Century Stainless Primer Seating Tool

$
0
0

The tool-makers at 21st Century Shooting have come up with a very slick new Precision Hand-Priming Tool. This extremely well-made, benchrest-grade unit raises the bar among single-primer seating tools. Feel is great, changing shell-holders is simple, and nothing else on the market offers better control over primer seating depth. The tool’s precision-adjusting head provides clicks in .0025″ increments for precise seating depth. The tool’s body, internals, and shell-holders are stainless, while the handle is anodized aluminum. Price is $118.00 with one shell-holder. Extra shell-holders (sizes from 17 Remington up to .338 Lapua Magnum) are $7.99 each.

21st Century Priming Tool Review
By Boyd Allen
I have been priming cases, with various hand-priming tools, for about three decades, and in the process have pretty much tried them all, from least to most expensive. When I found out that this new 21st Century tool was adjustable for seating depth, I wondered about that. After all, what do I, who believes in seating by feel, need with adjustable seating depth? Well…..I was wrong. Let me explain.

Why Adjustment for Primer Seating Depth Is Important
Most hand-seating tools do not have an adjustment for how far up the priming punch comes up into the shell holder. As a result, when priming a case with a deep pocket, especially if there has been some wear of the tool’s linkage, the finger/thumb lever may contact the tool’s body before the primer is fully seated. Having a primer seated too high can cause a myriad of problems. Prior to this, the only seater that I had used that had an adjustable linkage was the Sinclair tool, and adjusting its linkage requires disassembly — regular disassembly if you want to keep it perfect. That’s not convenient. The Sinclair is good tool, but a pain in the neck to adjust.

Precision Control Over Seating Depth — With Click Adjustment
The 21st Century Priming Tool offers quick and easy depth adjustment (unlike its rival from Sinclair). The 21st Century unit can be adjusted in precise increments (.0025”) more quickly than you can read this sentence. The knurled head of the tool is threaded onto the body, which has a very sturdy ball and spring detent indexing system that is easy to adjust and precise. Clicks are secure and positive. With this feature, you can set the tool so that the handle is in any position (distance from the tool body) that you find convenient, when the primer is fully seated. Additionally, since leverage increases as the handle approaches the tool body, different stopping points afford differing mechanical advantages (more or less effort required) and sensitivity. By doing a little experimenting, I have found a point of adjustment that give me better feel for when the primer hits the bottom of the pocket, without overshooting the mark, while keeping the force requirement within a range that is comfortable when priming a large number of cases.

Quick and Easy Shell-Holder Changing
Changing shell holders is easily accomplished. No extra hex-wrenches or tools are needed, and there are no tiny set screws to roll of the desk, to be lost forever in the carpet, never to be heard from again until you hear them rattling up the vacuum cleaner hose. To swap shell-holders, simply screw the head off of the body, lift off the one that you one that you are replacing, set the one that you intend to use in place (assuming that it used the same size primer) and screw the head back down to the setting that you want. Changing primer sizes is equally easy. NOTE: The tool requires 21st Century-made shell holders. These may be turned (relative to the handle) so that the loading slot opening faces whatever direction you prefer.

Fit, Finish, and Feel
The body and head of the tool, as well as the internal linkages, are all made from stainless steel. These closely-fitted parts are precisely machined, with an smooth, attractive finish. The handle is black anodized aluminum. Overall, the tool is well-shaped, and built like a stainless/aluminum brick.

Bottom Line: Great Tool That Works Exceptionally Well
I can’t imagine anyone, who uses a single-primer tool of this type, not liking this tool. When it comes to hand reloading tools, I can afford to have pretty much whatever I want (within reason). After testing and using this tool, I pulled my Sinclair tool from its case, and replaced it with this one. That should say it all. After using this tool, I will have to give serious consideration to other 21st Century reloading products the next time I need a new tool. One thing is for sure — we have an important new player in the design and manufacture of top end of reloading equipment. 21st Century’s Precision Priming Tool “raises the bar” among single-primer seating tools.

Tool Size Considerations
I wrote the review and then took the pictures, which, upon reflection, make the tool look smaller than it is, because of the size of my hands. I thought about putting a ruler in the pictures, but rejected that as visual clutter, so I will simply tell you that from tip of thumb to that of my little finger, my right hand measures a little over 10 inches, and the palm is 4 inches wide. The size of the tool is just right.

Whidden Gunworks Sizing & Seating Dies

$
0
0

There is a new player in the field of elite die-makers: Whidden Gunworks. John Whidden’s Georgia-based company is producing outstanding full-length sizing dies and micrometer-top seater dies for 7/8-14 thread presses. The dies look great, work great, and produce very straight and accurate ammo. The Whidden dies are finished beautifully inside and out. They are priced competitively and they are available for popular “extreme accuracy” cartridges such as the 6PPC, 6mmBR, 6mmBRX, 6 Dasher, 6XC, 6.5×47, .260 Rem, .284 Win, and .308 Win (and more). If you are looking for a die set for your new precision rifle, you should definitely check out the Whidden dies. Two-die set, FL Sizer and Micrometer-top Seater, costs $184.99. Sizer die alone is $74.99, while Seater die alone is $109.99.

Many of our Forum members have started using Whidden dies — and they are reporting very positive results. I personally own and use a set of Whidden dies, and I am very, very impressed with them. Here’s my report:


Editor’s Report on Whidden Dies
AccurateShooter.com good gearI have a set of Whidden Gunworks dies for my personal 6BRDX (a chambering similar to 6 Dasher but with longer neck). The dies are excellent and they produce very straight ammo. My loaded rounds (made with a Whidden bushing-type FL sizer and Whidden micrometer-top seater) are showing less than .0015″ run-out measured on the bullet, with the majority closer to .001″ run-out. (This is with Lapua Scenar L bullets, which have great jacket uniformity and concentricity.)

One thing I immediately noticed about the Whidden seater die is that there is a very close correspondence between the seater “hash marks” and true changes in seating depth. By this I mean when you dial a value change of 10 on the micrometer scale, you get very close to a .010″ change in seating depth. It is not perfect, but it is definitely more precise than most other micrometer-top seater dies I’ve used (both hand dies and 7/8-14 thread screw-in types).

Whidden diesCartridges loaded with my Whidden sizer and seater dies have proved very accurate. My 6BRDX is shooting in the mid-ones for five shots at 100 yards. I also have a micrometer-top Wilson inline seater die that was custom-bored with my chamber reamer. As far as I can tell, the ammo loaded with the screw-in Whidden seater is every bit as accurate as rounds loaded with the Wilson die using an arbor press. Additionally, with the Whidden micrometer die, I can hold extremely tight tolerances on base-to-bullet-ogive lengths.

In the past, with my 6mmBR, I favored an inline die because I thought it offered better control over seating depth. But given how well the Whidden seater works, I’m not sure I’d gain anything with my Wilson hand die. At least when used with a quality Harrell’s benchrest press, the Whidden seater gives up little or nothing to the hand die, and that’s big news in my experience.

Whidden Gunworks die

You will like the look and feel of these Whidden dies. The finish inside and out is very, very good — the dies have a quality feel and run very smoothly. Both the sizer and seater have a fluted section — this offers a better “grip” when you’re screwing in the dies. The outside of the seater has a smooth, gloss-anodized finish — it exudes quality. The markings on the seater’s micrometer ring are crisp and very legible, with large, high-contrast white-on-black lines and numbers.

One other very cool feature of the Whidden sizing dies is that custom-sized tapered expanders will soon be offered. Whidden plans to offer expanders in .0005″ (one-half thousandth) increments. This is great if you have, say, a .265 bushing and a .266 bushing but you want just a little less neck tension than the .265 offers. With the tapered expander, I can use a 0.265 bushing followed by an 0.2655 expander — allowing more precise control of neck “grip”.


Whidden Gunworks Sizing Die Seater

Whidden Die Features
  • Die Dimensions well-matched to PT&G reamers used for match chambers.
  • Sizing dies spec’d for easy chambering and extraction without overworking brass.
  • All sizers include shoulder datum collar to measure shoulder “bump” and headspace.
  • Neck bushing or no-neck bushing configurations.
  • Bushing dies use standard Redding/Wilson type bushings.
  • Neck diameter of non-bushing FL sizers can be set to customer specification.
  • Extended threads on short cartridge sizer dies such as BRs.
  • Coming soon: custom expander balls (in half-thousandth increments) to adjust neck tension and provide minimum working of the case neck.
  • Seater: Floating sleeve on micrometer seater enhances concentricity of loaded rounds.
  • Seater: Large, high-contrast markings for easy adjustment.

Custom Dies for Wildcats or Your Cartridge

  • Custom-made for your wildcat or standard cartridge.
  • Can work from fired brass or a chamber drawing to match your chamber exactly.
  • Neck-bushing die, or no-bushing die with neck diameter bored to customer specification.

Whidden Gunworks Sizing Die SeaterAvailable Die Sets
Here is the current caliber list. Micrometer seaters available for all listed calibers except 22BR and 22 BRX.

Full-Length Sizer with Bushings
22 BR (No Seater Die)
22 BRX (No Seater Die)
6mm PPC
6mm BR
6mm BRDX
6mm BRX
6mm Dasher
6mm SLR
6mm XC
6×47 Lapua
.243 Win
6.5×47 Lapua
.260 Rem
6.5-284
.284 Win
7mm Shehane
.308 Win
.338 Edge

Full-Length Sizer (Non-Bushing)
22 BR
6MM BR
.243 Win
6×47 Lapua
.260 Rem
6.5 Creedmoor
6.5×47 Lapua
.308 Win

Whidden Gunworks Sizing Die Seater

John Whidden Talks about Sizers, Seaters, and Expanders

Whidden Gunworks Sizing Die SeaterThere are two sides to our die business. First we are stocking dies in many calibers that are of interest to those who visit this website (such as the 6PPC, 6mm Dasher, 6.5×47 Lapua, .260 Rem, 7mm Shehane, .308 Winchester). These dies are a good fit to the “match chamber” reamers and very few people with these calibers should have to have “Pure Custom” dies made. We have both sizers and micrometer-top seaters ready to go for the many cartridge types listed above. The sizer dies will include a shoulder datum collar that makes it easy to measure shoulder “bump” during the full-length sizing process. This is important to control headspace precisely.

On the “Pure Custom” side, we have a huge amount of flexibility. We can make one-of-a-kind sizers and seaters for wildcats in a short period of time and at an excellent price. We can work with the customer to make full-length sizers, neck sizers, shoulder bump dies, small base dies, or most anything else they can need. We can of course provide micrometer-top seaters for these cartridges as well. We can make non-bushing sizers with specific neck inside diameters tailored to customer specifications.

We will also be offering custom-sized expanders. These expanders will fit our dies as well as Redding dies. Our tapered expanders will be available in .0005” (one-half thousandth) increments for the common calibers. In our shop we have had excellent results using expanders in the dies as long as the expanders provided the correct amount of neck tension and didn’t overwork the brass. Expanders have gotten a bad reputation in recent years but we find them to be excellent tools when the same precision is applied to their use that careful handloaders apply to the rest of their process. Expanders can be most valuable for those who choose not to neck-turn their brass (because the expander pushes neckwall variations to the outside).

One last thing — many gunsmiths with their own wildcats (or “specialty” chambers) have asked us to provide dies for their customers. We gladly do batches of custom dies and encourage gunsmiths to contact us. — John Whidden

For more information visit WhiddenGunworks.com or call (229) 686-1911.


EVO F-TR Bipod from Third Eye Tactical

$
0
0

Review by Alan de Lacy of F-TR Ireland
EVO Leisure (the makers of Third Eye Tactical products) provided four brand-new EVO F-TR bipods for review and testing. When we collected the bipods from Stuart Anselm of Osprey Rifles, the European and Worldwide exporter of Third Eye Tactical products, I was struck by the lightness of the bipods. Carrying four bipods under one arm, I noted how light, neat, and tidy they were.

Osprey EVO F-TR Bipod Ireland

Build-quality is excellent, as one might expect from a Third Eye Tactical product. Manufactured from what appears to be hard-anodized CNC-machined solid aluminum parts — each element appears to have been machined from solid billet aluminum. No pressed- or sintered-aluminum parts here!


Support Your Site

Osprey EVO F-TR Bipod IrelandThese EVO-FTR bipods are available in two colors: A very tacticool satin black and a nice satin gray. The finish appears to be hard-anodized, rather than painted or powder-coated. Milled from solid aluminum, the structural integrity is retained, while reducing the weight, by machining out sections of the aluminum to form a “honey-comb” or lattice-structure within the leg elements, on the underside.

Vertical adjustment is by way of a capstan turn-wheel, readily accessible from the prone position (even for those with short arms). The vertical adjustment is fast yet positive. When set, there doesn’t appear to have any play or backlash. The aluminum feet are decent-sized, 75mm-long curved sled-feet, finished to match the bipod.

Attachment to the rifle is by way of an aluminum mounting-block which fits quickly and neatly to a standard Universal Rail. Securing the mount is by way of a PodLoc-type lever and fixing is positive and secure. Also available from Osprey Rifles is a mount for a standard-sized QD sling-stud. The adjustment for cant is also easily provided by way of a Podloc lever and has a wide range. Again, this can be operated and adjusted while in the prone position.

EVO F-TR Bipod

EVO F-TR Bipod Specifications:

  • Overall Weight (including attachment): A fraction under 1.75 lbs. (800 grams)
  • Lowest Height (Ground-to-Underside-Rail): 13.5cm (5.3 inches)
  • Maximum Spread-of-Feet (at Lowest Setting): 48cm (18.9 inches)
  • Highest Height (Ground-to-Underside-Rail): 25cm (9.8 inches)
  • Minimum Spread-of-Feet (at Highest Setting): 36.5cm (14.3 inches)

Support Our
SPONSORS

Osprey EVO F-TR Bipod Ireland

Field-Testing at Long Range
To provide two qualified opinions and to ensure that the new bipods were truly put through their paces, the reviewer, Alan de Lacy, was duly assisted by his regular F-TR team-mate and shooting-buddy, Adrian Casey. After some initial short-range bench-testing completed, we headed out to the 1000-yard Firing Line for the serious field-test. As F-TR shooters, we were shooting prone from-the-ground at 1000 yards onto the standard ICFRA F-Class 800-1000 yard target. The .308 Win rifles used in the range-test were a factory Sako TRG-22 (with a custom 32″ barrel) and a Savage 12 FTR (with custom 32″ barrel and stock). Both rifles had Anschutz-type UIT Universal accessory rails to which the bipods were attached. Both rifles are tried and tested in national and international competitions.

Osprey EVO F-TR Bipod Ireland

Adjustment (Range and Ease of Use) – The range of vertical adjustment is excellent as is the speed with which the EVO can be adjusted. A couple of quick rotations (3 or 4) of the capstan-wheel and the cross-hairs were on the target. No more time-consuming fiddling to bring the cross-hairs out of the vegetation or down from the clouds! While the vertical adjustment is as fast and extensive as we’ve seen on any F/TR bipod, the capstan-wheel also allows for a surprisingly welcome amount of fine-tuning of the vertical point-of-aim. The fine-tune vertical adjustment is positive and solid. Both guns stayed in position and the scopes’ point-of-aim did not falter once during the entire range-day.

Solidity – Throughout the day’s shooting, the rifles remain solidly planted in position. Any initial misgivings we may have had about a small amount of slack and looseness “in-the-hand” were dispelled once the ‘pods were fitted onto the rifles and weight of the guns loaded onto the bipods. Set-up on the firing point, the bipods (and the rifles) were rock-solid.

Tracking – Over the day, both shooters fired the equivalent of roughly three details each, all at 1000 yards, with over 100 rounds sent down-range. Rifle tracking and the guns’ return-to-battery were exceptional. “What I like best about this bipod is it tracks like it’s on rails”, commented tester Adrian.

Summary
Craig Coote of Third Eye Tactical, with design input from 2011 Euro F-Class FTR Champion Stuart Anselm, has produced one of the best bipods we have had the pleasure of using. Adrian was so impressed with the one he tested, he wouldn’t hand it back! While there are indeed lighter bipods and there are cheaper bipods, we think the EVO F-TR bipod has set a benchmark in terms of build-quality, adjustment, and ease of use. This bipod, while aimed squarely toward the F-Class F-TR market, would be equally at home on any range and in other disciplines. Everyone who has tested and inspected this new bipod is convinced that we’ve found a cost-effective, performance-for-weight optimized, great-tracking and great-looking new piece of equipment.

A more detailed version of this review originally appeared on the F-TR Ireland Facebook Page.
CLICK HERE to read full review with more field test information and shooter comments.

Digital Scales: GemPro 500, AY123, Sartorius GD503

$
0
0

This article first appeared in 2011.
JayChris, AccurateShooter.com’s IT “guru”, has tested three different digital scales. The first is the relatively inexpensive ($150.00) GemPro 500, the second was the $333.00 Sartorius AY123, which is very similar to the Denver Instrument MXX123 and Acculab-123. Lastly, JayChris tested his $1225.00 Sartorius GD503 lab scale. The 3-way comparison test produced interesting findings. We learned that the AY123 had some serious shortcomings when used to weigh powder. The GemPro 500 performed well for the price, but was quite a bit slower than the big GD503. In speed of response, accuracy of measurement, resistance to drift, and overall reliability, the GD503 was the clear winner in our comparison. Sometimes you do get what you pay for. CLICK HERE for GD503 Review with Videos.

digital scales GD503, AY124, GemPro 500 250

BATTLE of the BALANCES

Three-Way Comparison Test: GemPro 500, Sartorius AY123, Sartorius GD503
Testing Report by JayChris
Precision Weighing Balances, www.balances.com, an authorized Sartorius Distributor, shipped me an AY123 (same as Denver MXX123, Acculab 123, etc.) along with a high-end GD503 force restoration scale. I had purchased the GD503, while the AY123 was a loaner for this comparison test. I included in this test a GemPro 500 scale that I already had. My key objective in this comparison test was to test each scale for measurement drift over time. We wanted to see if the displayed weight of a given object (here a certified test weight), would change over time, or with repeated measurements.

AY-123 |GD503 | GemPro 500

The first test was a “quick” test, where I measured the same weight ten (10) times, in the same order, about every 30 seconds or so. I did this at about the same speed as weighing out powder, maybe a bit slower. This took about 5 or 6 minutes. The second test was more-or-less an overnight test, where I measured the same weight in lengthening intervals, starting every 10 minutes, then every 30, then every 60, and so on. You can see the time series on the included graphs.

digital scales GD503, AY124, GemPro 500 250

TEST SETUP:
- I used the same 100 GRAM Sartorius certified check weight for every test (see photo). Note: 100 GRAMS = 1543.233 GRAINS
- I calibrated each scale within 30 seconds of each other before starting the test.
- I tare’d each scale within a few seconds of each other
- All three scales are connected to the same line conditioning PDU and are located in the same environment (right next to each other)

Measurement Resolution and Display Increments
- The Sartorius AY123 measures to the nearest hundredth of a grain (.00). Increments are in 0.02 grain divisions, i.e. the nearest two hundredth of a grain.
- The Sartorius GD503 measures to the nearest thousandth of a grain (.000). Increments are in 0.005 grain divisions, i.e. the nearest five thousandth of a grain.
- The GemPro 500 measures to the nearest half-tenth of a grain (.05).

NOTE: When weighing powder, I weigh to the nearest .05 grain so any of these provide adequate (or more-than) resolution.

FIRST SERIES Quick Test:

digital scales GD503, AY124, GemPro 500 250

* X-axis is weighing series iteration

SECOND SERIES Time-based:

digital scales GD503, AY124, GemPro 500 250

* X-axis is a time series in minutes-from-0.

THIRD SERIES AY123 “Stable” vs. “Unstable”:

digital scales GD503, AY124, GemPro 500 250

* X-axis is a weighing series iteration

This is a test of the AY123 in “Stable” vs. “Unstable” environment mode. The GD503 was used for comparison. I ran this test to compare the AY123 in “Stable” conditions mode (default) vs. “Unstable” conditions mode, based on anecdotal reports that the “Unstable” mode produces more consistent results. I did not find that to be so. In addition, I found that the weighing time for the “Unstable” mode was extremely slow — taking nearly 5 – 7 seconds per instance to complete a measurement. It then takes a few seconds to return to zero. In the AY123′s default “Stable” mode, it takes a second or so. Based on my testing then, there is no advantage to running the AY123 (or similar clones) in the “unstable mood”. It will simply slow you down.

Observations and Conclusions
Overall, the GD503 was the most consistent, never varying more than .005 (five-thousandths) of a grain, which is about ten times less drift than the next closest scale. The GemPro was “close” behind, never varying more than .05 of a grain. The AY123 was consistently variable and lost significant resolution over time. It was difficult to plot the AY123 results because it rarely settled at a weight for longer than a few seconds — it would routinely come up with a different weight every few seconds, varying by as much as .04 of a grain. I selected the first reading it “settled” on as the “official” reading.

The one thing this test does NOT demonstrate is trickling — our previous Review of the GD503 has a video that shows that nicely. The GD503 gives you near instantaneous read-outs when trickling. By contrast, both the AY123 and GemPro 500 require a “trickle-and-wait-for-update” plan. The GD503 is really dramatically better in its ability to return a “final” weight very quickly. This allows efficient trickling. CLICK HERE for GD503 Review with Videos.

[UPDATE: One of our readers observed that there is a setting which can make the AY123 more responsive (and accurate) when trickling charges: "Note that the video shows the 123 jumping as powder is added. The reason is the scale is in the default setting, which is for single weightings. When changed to ‘Filling’ mode, the scale reacts very quickly, and in my case accurately. Trickling is easy in the ‘Filling’ mode. My experience is that the AY123 is an excellent scale, but is sensitive to environmental factors. The GD503 is way better and is also way more expensive." -- Matt P.]

GemPro 500 Performed Well — Drift Was Usually Minimal and Charges Settle Fairly Quickly
I’ve used the GemPro 500 for quite a while now and have found it to be fairly reliable. However, over one previous loading session I have seen it drift as much as .150 of a grain. I had to go back and re-weigh charges because of this. Therefore, I tend to tare it every five (5) weighings or so which is probably overkill based on one case. I’ve not had that problem since so I am guessing something happened environmentally (maybe I bumped it or something). Overall, the GemPro is not overly sensitive to environment and settles fairly quickly and reliably.

Charges Weighed by SD503 Have More Consistent Velocities, with lower SDs
I’ve loaded a few hundred rounds with the GD503 now. I have not found it to drift more than .010 of a grain in that time. So, now, I only tend to tare it once at the beginning of a load session. I have gotten extremely consistent velocities from charges loaded with this scale, with single-digit standard deviations. By contrast, previously, my best efforts usually resulted in standard deviations (SDs) in the low teens.

Based on my experience testing the AY123, I would not choose this scale to load powder with. The readings are just too variable. The slightest environment factors (breathing, hand movement, etc.) cause large changes in results. I tried to load some rounds using this scale (backed by my GD503 to verify) and I couldn’t do better than a few tenths of a grain, and that was with considerable effort. The Sartorius AY123 is really the wrong tool for the job when it comes to measuring powder.

Thanks to Precision Weighing Balances for providing the AY123 for comparison. The other two scales, the GemPro 500 and GD503, I purchased on my own nickel. [Editor's Note: When purchased in 2011, Jay's GD503 cost approximately $900.00. The current 2012 price at Balances.com is $1225.00.] All three of these digital scales can be purchased through the Precision Weighing Balances webstore:

GemPro 250 | GemPro 500 |AY-123 |GD503

Nightforce 15-55x52mm Competition Scope

$
0
0

Nightforce Competition 15-55x52mm scope

Nightforce Optics has just announced an all-new, side-focus 15-55x52mm Competition™ Scope. It looks very impressive. The ED (low-dispersion) glass in the new 15-55X provides high contrast, low chromatic aberration, and 92% light transmission. And this scope is a LOT lighter than the current NF 12-42x56mm BR Model — that will help guys make weight. We’re pleased to see the new scope offers a fast-focus, European-style eyepiece. Two reticles will be offered initially: the CTR-1 and DDR (shown below). The big question is “how much will it cost?”. A Nightforce dealer told us that Minimum Advertised Price (MAP) will be $2231.00. We’ll run a full report on this scope when we get our hands on it at SHOT Show.

Nightforce 15-55x52mm competition scope

Nightforce Competition 15-55x52mm scope

The big news is that, with a weight of just 27.8 ounces, the new 15-55X Nightforce Competition Scope is 24% lighter than the NF 12-42x56mm Benchrest model, and 20% lighter than the NF 12-42x56mm NXS. Like the NXS series, the new Competition scope offers side parallax adjustment; and, it will focus from 25 yards to infinity, making it suitable for rimfire and airgun shooting as well as centerfire competition. The turrets provide positive and repeatable .125 MOA (eighth-minute-of-angle) clicks. Each rotation provides 5 MOA of adjustment. And we’re pleased to see that the Competition Scope offers a full 60 MOA of travel — for both windage and elevation. That’s impressive.

Thankfully, you won’t have to wait long to get a 15-55x52mm Comp Scope. Nightforce says it will start shipping in mid-February. CLICK HERE for more information.

Watch Video to See NF 15-55x52mm Competition Scope (and B.E.A.S.T. sneak preview.)

Nightforce Competition 15-55x52mm scope Nightforce 15-55x52mm Competition Scope 2013 Shot Show

Review: SCATT MX-02 Electronic Trainer

$
0
0

SCATT MX-02 MX02 rifle trainer lens
by Tony Chow

Introduction
In recent years, the use of electronic trainers has revolutionized training in all disciplines of position shooting. By capturing valuable metrics like the steadiness of a shooter’s hold, accuracy of aiming, and the timeliness of trigger release, these devices can offer tremendous insight into the strengths and weakness of a shooter’s position and technique, making marksmanship training less of an “oral tradition” and more of a science. Popular trainers on the market include RIKA, Noptel, and the most ubiquitous of all, the SCATT Training System.

All existing electronic trainers on the market operate on the same basic principle: a sensor attached to the rifle monitors the position of an infrared light source close to the target; the position of the light source within the sensor’s field of view determines the rifle’s point of aim at any given instant. These products’ common reliance on infrared results in a common weakness: the inability to use them in outdoor ranges for live fire training, as sunlight is full of infrared radiation that overwhelms the sensor.

Now, a new product has entered the market. SCATT’s next-generation MX-02 electronic trainer promises to perform just as well as the company’s older WS-01 infrared-based trainer in dry fire, but with the new ability to be used in live fire under broad daylight, with both smallbore and centerfire calibers. As a committed smallbore prone shooter who has long desired such a product, when I was offered a unit to review, I jumped on the opportunity. Does SCATT MX-02 live up to its lofty promises? That’s the question this review seeks to answer.

What’s in the Package
SCATT’s previous-generation product, the WS-01, comes packaged in a large flat box. By contrast, the new SCATT MX-02 is packaged in a sleek 9”x7” nylon pouch, designed for portability. Inside it, we find a comfortably long 9-foot USB cable for the sensor, two hex wrenches, a basic instruction manual, and a padded plastic box that contains the sensor, the mounting bracket, as well as a USB thumb drive with the SCATT software on it.

The contents of the SCATT MX-02 package
SCATT MX-02 MX02 rifle trainer lens

The MX-02 package is reduced in size due to the absence of a powered target frame. Unlike the electronic trainers that came before, the MX-02’s sensor operates in the visible spectrum, which eliminates the need for an infrared light source at the target end. Essentially, the sensor is a high resolution, high-speed camera, capable of recognizing the target’s dark bullseye within its white background, and assessing the rifle’s point of aim based on the bullseye’s position within its field of view.

SCATT MX-02 Sensor (left) alongside the SCATT WS-01 Sensor (right)
SCATT MX-02 MX02 rifle trainer lens

Despite its sophistication, the MX-02 sensor is impressively compact. It is only slightly bulkier than the WS1 unit, and not much heavier; with the sensor attached, the shooter is unlikely to notice any change in the rifle’s balance. There is a lever on the sensor itself, which the user needs to adjust to focus the sensor on the target, depending on the distance between the two. The adjustment range is from 2.5 meters to infinity. A setscrew locks the focal distance in place.

The SCATT MX-02 sensor, seen mounted on a Grünig & Elmiger Racer smallbore rifle
SCATT MX-02 MX02 rifle trainer lens

The sensor is attached to a V-shaped mounting bracket through a dovetail interface, which in turn clamps onto the barrel of the rifle with a metal band. The band locks onto the mounting bracket through one of its six perforations on one end, and a screw on the other end, which tightens the whole bracket-band assembly around the barrel.

For more information or to order SCATT products, including the new MX-02, visit ScattUSA.com or call toll-free: 1-855-57-SCATT (72288).


Setting up the SCATT MX-02
For existing users of SCATT, setting up the MX-02 is a familiar and intuitive process. The sensor is fastened to the end of the barrel, and connected to a laptop computer, on which the SCATT application is installed. For dry firing, the SCATT application prints out targets scaled to the appropriate distance. The target is taped to the wall or some other vertical surface. The target face needs to be very well lit, particularly for MX-02, since both the shooter and the sensor need to be able to “see” it. A table lamp works nicely.

When live firing, the shooter simply fires on normal, full-sized targets. One major caveat is that you may not use multiple-bull American smallbore targets. For the time being, at least, the SCATT software supports only single-bull targets.

Now is the time to sling up and get in position. The shooter starts the SCATT application on the laptop and selects the discipline he or she desires to train in. There are numerous choices, from NRA High Power to International 50 meters. Upon selecting a program, the shooter is presented with a screen to fire one shot to calibrate the sensor. If the sensor “sees” the target, the calibration screen shows a crosshair indicating where the target is in the sensor’s field of view. Upon detecting the calibration shot, the software is ready to record shot tracings and metrics, using the calibration shot’s placement as its initial zero.

The sensor calibration screen for SCATT MX-02. The crosshair represents where the target bullseye is within the sensor’s field of view.
SCATT MX-02 MX02 rifle trainer lens

This is when setup could get a bit complicated. In my experience, the calibration process is trouble-free for live fire at 50 meters and beyond. However, if you are dry firing within confined spaces where the target-sensor distance is less than 10 meters, you will likely run into a snag during calibration: no crosshair would appear on screen and your shot would fail to register. This is due to the fact that the sensor has not yet been adjusted to compensate for parallax, which is caused by the several inches of distance between the line of sight for the shooter, which is above the barrel, and the line of sight for the sensor, which is beneath the barrel. The SCATT MX-02 sensor is sensitive to parallax because it has a very small field of view compared to its IR-based predecessor. At live fire distances, parallax becomes insignificant and does not pose a problem. But at short shooting distances, when the shooter’s line of sight centers on the target, the target might be completely out of the sensor’s field of view.

SCATT MX-02 MX02 rifle trainer lensTo compensate, MX-02’s mounting bracket is equipped with two brass setscrews with which you can fine-tune the “aim” of the sensor. To aim the sensor upward, flip the bracket so that the screws are at the rear, and turn both screws the same number of revolutions inward. Conversely, position the screws at the muzzle end to aim the sensor downward. Turn one screw more than the other to move the aim left and right.

This is a procedure more easily performed while the rifle is on a rest rather than in position. To determine the direction in which you must move the sensor, and by how much, you will need to shift the aim in all four directions until the crosshair lands on the center of the calibration screen. And then, you need to adjust the setscrews incrementally until the lines of sight for both the shooter and the sensor converge on the center of the target. Fortunately, this is a one-time ordeal. Once you find the correct setting, I recommend putting a drop of green Loctite on both screws to ensure that they stay put over time. (Be careful that the Loctite doesn’t seep into the sensor dovetail and prevent you from removing the sensor later, which you need to do in order to change the focus.)

Dry Firing Evaluation
Even though outdoor live fire capability is MX-02’s main selling point, most buyers will want to use it mainly in the same way as they did the previous generation of SCATT: dry firing at home. Home training is convenient, saves ammo, and many problems in shooting technique can be diagnosed and corrected through dry firing. In order to be considered a viable product, therefore, the MX-02 must work as well in dry fire as did the previous generation trainers.

Here is the author’s dry fire setup. The target paper is held in the disconnected target frame of a SCATT WS-01, but any well-lit vertical surface will do.
SCATT MX-02 MX02 rifle trainer lens

In this respect, the MX-02 doesn’t disappoint. I alternately performed 10-shot strings using both MX-02 and the IR-based WS-01, and the results are practically the same. The tracings produced by both sensors are very comparable. The shot metrics obtained from MX-02, such as stability of aiming and tracing length, are also within my normal ranges.

A typical dry fire tracing from SCATT MX-02 (left) alongside a tracing from SCATT WS-01 (right).
SCATT MX-02 MX02 rifle trainer lens

To put it simply, aside from a somewhat more complicated calibration process, dry firing with MX-02 is typical SCATT, and that’s a good thing. SCATT MX-02 uses the same Windows software for data capture and analysis as its predecessors. This means that shooters and coaches upgrading to MX-02 will have no learning curve to overcome, and newcomers to the SCATT platform can tap into the wealth of knowledge accumulated over the years by the shooting community on how to interpret shot data.

Live Firing Evaluation: Smallbore
Strictly speaking, several electronic trainers on the market already support live firing; in the case of SCATT WS-01, a special target frame, containing IR emitters and designed to be placed near the actual target, can be purchased to enable this feature. However, due to the nature of infrared, such support has been restricted to indoor use only. Since access to full distance indoor ranges suitable for position shooting is extremely limited, especially in North America, most shooters have been effectively denied the possibility of using SCATT in live fire. The SCATT MX-02 is the first electronic trainer to overcome this limitation and fully support outdoor use, finally making live fire capability available to the vast majority of shooters.

SCATT MX-02 is designed to work with both smallbore and centerfire calibers. At the time of publication, we have only tested the review unit with smallbore rifles. An upcoming revision to this review will contain evaluation results from High Power shooting.

Testing Methodology
The smallbore live fire evaluation took place at my home range, Los Angeles Rifle & Revolver Club. The SCATT MX-02 was used alongside a SIUS ASCOR electronic target. The weather in Southern California was sunny and largely wind-free throughout the multiple evaluation sessions.

I wanted to find out if SCATT’s usefulness might vary among shooters of different skill levels. Therefore, two prone shooters took part in the test: myself, a high-level shooter who averages mid-to-high 590s on the ISSF 50m target; and Jober Velasco, an intermediate-level club shooter averaging around mid-560s. This gave me the opportunity to act as the coach to Jober, and to use his SCATT data to come up with performance suggestions.

We each performed multiple 10-shot strings. After each string, we took a snapshot the group on the SIUS target, and saved the corresponding SCATT tracing file for later comparison.

We didn’t spend a lot of time trying to match the zero on “paper” and the zero in SCATT. While centering the groups in both places is possible, I don’t consider it worth the time, as we are mainly interested in comparing the shapes of the groups and reading the tracings.

Results: Intermediate-Level Shooter

A selection of strings shot by Jober Velasco is provided below, with each live-fire group on top of its SCATT counterpart.

SCATT MX-02 MX02 rifle trainer lens

Here are Jober’s strings. The live fire groups are on top, the SCATT groups at the bottom.
SCATT MX-02 MX02 rifle trainer lens

As we can see, the shapes of SCATT and live-fire groups are largely comparable. It is not realistic to expect them to match exactly, due to the random dispersion inherent in the ammunition, which SCATT cannot replicate. Ammunition is especially a factor in Jober’s groups, as he was shooting his sub-optimal practice ammo, which is likely why his second live fire group is so much larger than the SCATT group.

Despite the uncooperative ammo, the tracings captured by SCATT explain a lot about Jober’s performance. Take, for example, shots marked #14 and #18 within his third 10-shot string, which are to the extreme right and left of the group, respectively, both in SCATT and on the live target. The shot tracing in shot #14 shows that his aim was high, and then got pulled to the lower right at the moment of shot release, whereas during shot #18, his aim was continuously listing toward 8 o’clock. This tells us that Jober needs to improve his trigger release, during which the point of aim should not move. The quality of his natural point of aim is also suspect, as a shooter’s aim tends to drift to his true NPA if it is not aligned with the center of the target.

The SCATT tracings tell us exactly what caused Jober’s two worst shots to go so far afield. Disregard the fact that SCATT zero is quite a bit off from the live zero; the relative position of two shots is what we are interested in.
SCATT MX-02 MX02 rifle trainer lens

Jober’s wobble zone, as indicated by the yellow line, is a little larger than the 10-Ring. It can certainly be reduced considerably, if he works on improving his position. His approach to the center, as indicated by the green line, is rather chaotic, which suggests to me that he is steering the gun to the center rather than relying on a sound NPA. Jober’s recoil pattern, indicated by the red line, is usually vertical, but can sometimes be completely out of control, as shown in the following tracing:

Bad Recoil Revealed — Here is a particularly bad recoil pattern from Jober.

Bad Recoil SCATT MX 02

Thus, the use of SCATT MX-02 in live fire has given us considerable insight into the performance deficiencies of an intermediate-level shooter. Granted, a lot of this information can be acquired from dry firing with SCATT, but some factors, such as recoil characteristics and the role played by ammunition quality, can only be evaluated in live fire. We shall now see whether live fire data could be even more illuminating for a high-level shooter.

Results: High-Level Shooter

A selection of strings shot by the author is provided below, along with some sample tracings.

The author, Tony Chow, in prone shooting position.
SCATT MX-02 MX02 rifle trainer lens

Shown are strings by Tony Chow. Live fire groups are on top, with the SCATT groups at the bottom.
SCATT MX-02 MX02 rifle trainer lens

To reach world-class level in prone shooting, one needs to consistently land hits well within the 10-Ring. Frequent loose 10s and tight 9s are unacceptable. By these standards, my performance still has some way to go. So what clues can we glean from the SCATT data? The most obvious area of improvement is aiming accuracy. Points of impact on target correspond pretty well with the relative positions of points of aim shown in SCATT. In fact, SCATT offers a dedicated metric — Stability of Aiming — that shows at a glance the shooter’s aiming consistency. Smaller numbers are better. On the 50m ISSF rifle target, aiming error of around 7mm is quite typical. A value of 5mm or under would be ideal.

SCATT MX-02 MX02 rifle trainer lens

Aiming error is an important factor, but insufficient to explain my worst shots. Take shots #1 and #8 in the third string; they are at least 15mm apart from each other on the live target, center-to-center. Yet in SCATT, the aiming points of these shots (represented by the yellow crosshair marking the center of the last second of tracing) are just 5mm apart. What accounts for the rest of the dispersion? Ammunition could be an explanation, but considering the match-quality ammo that I was using—a lot of Lapua Center-X well suited to my rifle that regularly shoots decimal strings of 105.0 or better when I’m in top form—it’s one that should be turned to only as a last resort in the analysis. In this case, the ammunition factor can be safely discounted, because the shot tracings contain a vital clue: for both shots, the direction of shot displacement is same as the direction in which the tracing is traveling at the junction between the blue and red parts of the line, which represents the first instant of shot release:

The author’s two worst shots are well explained by the movement captured by SCATT MX-02.
SCATT MX-02 MX02 rifle trainer lens

This movement isn’t the recoil, which is a much more violent motion constituting the bulk of the red portion of the tracing. Nor could is it likely to be the trigger jerk; if that were the case, it wouldn’t be so brief in duration and random in orientation from shot to shot. Rather, the most likely explanation is that this area of the tracing is simply a moment in the natural vibration of the muzzle, the “wobble” within my wobble zone. If so, it would mean that the vibration inherent in my hold is a force strong enough to significantly displace the bullet in whatever direction the muzzle happens to be traveling at the moment of shot release.

An examination of the rest of the shots in the group seems to bears out this theory. Shot #7 is the lowest in the group, and the tracing shows that the muzzle is moving downward during shot release:

The low 7th shot correlates with a downward muzzle movement during release.
SCATT MX-02 MX02 rifle trainer lens

In some shots, the muzzle happens to be changing direction during shot release. In theory, the muzzle’s momentum is at its slowest at such moments, and should not displace the shot as much. As it turns out, as these shots do happen to be some of the best in the group:

Some of the best shots occurred when the tracing happened to be turning during release.
SCATT MX-02 MX02 rifle trainer lens

For me, the fact that muzzle oscillation plays such a major role in determining shot placement is an important revelation. It tells me convincingly that to have fewer flyers and higher scores, I must work to reduce the amount of vibration in my hold. SCATT provides a specific metric, the Tracing Length, which can be used to assess the speed of muzzle vibration. At this time, even though I have a much smaller hold than Jober, my tracing lengths aren’t much better than his—50mm to 60mm—indicating that the muzzle is vibrating very quickly within a tiny area. By contrast, world-class shooters exhibit tracing lengths in the 20-40mm range.

Trace Length Comparison
Tracing Length isn’t a feature introduced by MX-02; previous generations of SCATT have always had this it. Yet until now, I have largely ignored this metric. Only with the help of MX-02, did I realize how important it truly is.

T. Chow trace lengths (left) compared to those of Russian shooter Marina Bobkova (right):
SCATT MX-02 MX02 rifle trainer lens

This, to me, is where SCATT MX-02 proves its worth. Its outdoor live fire capability not only can provide information not available in dry firing, it can also help shooters and coaches better understand the significance of data captured in dry firing. There’s simply nothing like being able to correlate SCATT tracings with the real holes on target, and that makes SCATT MX-02 a uniquely useful tool.

Conclusion
It isn’t often that a product that promises so much ends up delivering on all counts. SCATT MX-02 comes very close. It is well made, portable, reliable, and, aside from a potentially more involved calibration process, easy to set up. In dry fire mode, it is a worthy successor to its IR-based predecessors, and provides the same wealth of data that users have come to expect from a SCATT product. MX-02’s outdoor live fire capability works well and opens up intriguing training possibilities. When the data is interpreted correctly, it can reveal problems in shooting invisible in dry firing, as well as help users better understand the implications of dry firing data. I highly recommend this product for anyone serious about mastering position shooting.

The MSRP for SCATT MX-02 is $1,799, $500 more than its predecessor, the SCATT WS-01, which is still available for sale. In my view, the extra premium is justified by the new capabilities of the product. For newcomers to electronic trainers, SCATT MX-02 is undoubtedly a better value and long-term investment than its infrared-based competitors.

For those who already own an electronic trainer, whether it is worth upgrading to the MX-02 depends on the shooter’s skill level. Beginners and intermediates still working on fundamentals should spend most of their training time doing dry firing. Accordingly, they may be adequately served by the IR trainers that they already own. On the other hand, more advanced shooters, who are chasing those last 5 points in their scores, should seriously consider upgrading to the MX-02, as they are in the position to fully exploit SCATT MX-02’s powerful features.

Interested readers can examine SCATT MX-02 at the 2014 SHOT Show in Las Vegas. SCATT will have the MX-02 on display at SHOT Show Booth 111.

How Do Suppressors Affect Accuracy?

$
0
0

Shooting Sports Suppressor Sound

Shooting Sports Suppressor SoundAre sound suppressors useful in competition shooting? In some disciplines, and in venues where sound “moderators” are permitted, the answer is “yes”. In the November 2012 edition of Shooting Sports USA eZine, you’ll find an interesting article about the use of sound suppressors (aka “cans”, “silencers”, or “moderators”). The article explores the use of suppressors in Europe and in tactical matches in North America. You’ll also find an explanation of the rules and regulations governing suppressor ownership and use in the United States.

Shooting Sports Editor Chip Lohman tests three rifles from the bench and found that sound suppressors did not harm accuracy. In fact, all three test rifles (one each in .223 Rem, .308 Win, and .338 Lapua Magnum), shot slightly better 5-shot groups at 200 yards when a suppressor was fitted to the barrel. However, the suppressors did alter point of impact. Interestingly, velocity standard deviation (SD) values were lower with suppressors in place for all three test rifles. This observation calls for further study.*

CLICK HERE to Read Suppressor Article in Shooting Sports USA.

Shooting Sports Suppressor Sound

So the use of suppressors in competition could be a good thing. However, in the United States, current NRA High Power rules prohibit the use of sound suppressors. NRA Rule 3.16.1 subsection (a) states: “Sound Suppressors are not authorized for use in High Power competition.” In addition, there are some practical problems with suppressors — the heat rising off of a naked suppressor can create mirage problems (that’s why some shooters wrap their cans with a cover).

Despite such issues, we are starting to see moderators on rifles used in non-NRA-sanctioned tactical matches. For example, many competitors in the popular Steel Safari field challenge match use suppressors. The photo below shows our friend Zak Smith competing in the Steel Safari with his suppressed Accuracy International rifle.

Zak Smith Thunder Beast Steel Safari Suppressor

*The article cautions that one should not extrapolate too much from the SD numbers, given the low number of test shots. Chronograph-maker Ken Oehler, when asked to comment on the SD values stated: “[You should] report the observed SDs, but draw no conclusions until… you can do more testing with larger sample sizes.”

Combo LRF, Spotting Scope, and Wind Meter

$
0
0

Here’s an impressive hardware package for long-range shooting. This set-up combines a folded-path spotting scope with a Laser Rangefinder (LRF) and a Kestrel Wind Meter. The LRF is mounted directly to the Hensoldt-Zeiss spotting scope ($4330.00 retail) so the two units stay aligned at all times. That makes it easy to spot and range your target quickly. LRF and weather data is piped into a PDA which automatically generates a firing solution (providing windage and elevation adjustments). That’s slick.

Ashbury Precision Ordnance sent us these photos, noting: “The ingenuity of APO customers never ceases to impress us! This rig has a co-located LRF adjustable for azimuth and elevation, a Kestrel weather station (Bluetooth?) and Trimble NOMAD RPDA. Firing solutions are updated as data is transmitted to the PDA from the LRF and weather station. That Hensoldt Spotter 60 is a nice piece of glass for shooting at extremely long distances.” The spotting scope is mounted on a Manfrotto 410 3-axis geared head.

Click Image to View Full-Screen Version
Ashbury Hensolt Zeiss Spotting Scope LRF Laser Kestrel Trimble Nomad

Click Image to View Full-Screen Version
Ashbury Hensolt Zeiss Spotting Scope LRF Laser Kestrel Trimble Nomad

17HMR Semi-Auto: The New Savage A17

$
0
0

A17 A-17 savage 17 hmr varmint rifle

They say a picture is worth a thousand words. In this case a video is way more illuminating than anything we can write. The video below, produced by Savage, demonstrates how the new 17 HMR Savage A17 rifle works. The video includes nicely-done 3D Graphics that illustrate the function of the A17’s delayed-blowback action with “interrupter lug”. Using “X-Ray View” animation, the video shows what happens INSIDE the chamber as rounds are fired. The video also explains how the 17 HMR presents a tougher engineering challenge than the lower-pressure .22 LR cartridge.

Watch this Video — You’ll Learn Something about Semi-Auto Rimfires

NOTE to Readers: Watch the video! If you have any interest in how guns work, check this out (full-screen if possible). For some reason (maybe slow connections), most readers skip over the videos we embed in our stories. In this case, take 3 minutes to watch. Click arrows button to view Full-Screen.

A17 A-17 savage 17 hmr varmint rifle

Savage officially launched the A17 this month, after previewing the new 17 HMR rifle at SHOT Show in January. We tested the gun on Media Day and came away very impressed. The A17 fed and functioned flawlessly. It is fun to shoot, and it will be affordable. MSRP is $469.00 so street price should be about $425.00. READ AccurateShooter A17 Report.

A17 A-17 savage 17 hmr varmint rifle

We plan to test one of these very soon. If the field test goes as well as I expect, your Editor will probably buy one of these rifles. The A17 has a barrel nut system just like centerfire Savage rifles. This means it will be easy to fit an aftermarket custom barrel to the A17. We already have some ideas for a suppressed A17 project gun with upgraded stock and barrel(s). Stay tuned….

A17 A-17 savage 17 hmr varmint rifle

The Magic Chicklet
Look below at the A17 bolt. The little black hardened metal piece (called a “chicklet” by the Savage engineers) is the secret ingredient. This “Interrupter Lug” retracts, allowing the A17 to operate in delayed blow-back mode. That permits the A17 to function flawlessly with the 17 HMR cartridge.

Savage A17 bolt chicklet


Lefty AR Upper — Not Just for Southpaws

$
0
0

Here’s something you may not have seen before — a left-port, side-charging AR15 Upper. This unit was developed by John Scandale of Keystone Accuracy. While this was designed for left-handed High Power shooters, the lefty upper also works well for right-handed F-TR shooters. This design allows a prone shooter to single-load with his left hand, an efficient system for a right-handed shooter. Here is a review of the lefty upper from German Salazar’s Rifleman’s Journal website. Like John Scandale, German is a southpaw.

The Lefty AR Upper from Keystone Accuracy

by German Salazar, RiflemansJournal.com
We left-handed shooters are always the last to get the benefit of new firearms developments, or so it seems to us most of the time. There is no rifle more popular today than the AR15, whether for competitive shooting or plain recreational use; but even for that ubiquitous black rifle, left-handed items are few and far between. However, Keystone Accuracy run by left-handed High Power shooter John Scandale has some good stuff for us.

Left-handed Left AR15 Upper German Salazar Keystone Accuracy  Scandale

left hand ar15 upper keystone accuracy

John is a long time High Power shooter, a member of the National Guard’s All-Guard rifle team and a Distinguished Rifleman. He knows exactly what makes a good High Power rifle — unlike many of the mail-order parts and pieces you see offered for sale by someone who only shoots his computer keyboard… John is a real shooter, I’ve known him for many years and trust his work.

The most interesting item from Keystone is the left-hand billet upper receiver for the AR15 match rifle. This thick-wall, CNC-machined piece appears to be very durable and fits all existing AR15 lower receivers.

left handed billet ar-15 ar15 upper side port

When the AR15 was becoming popular in High Power shooting in the mid-1990s, I had a match rifle built on one. To solve the left-hand problem, I had a second port milled into the left side to allow me to load the rifle comfortably in slow-fire, single-load matches. Unfortunately, sometimes the round I flicked into the left port would fall right out of the right port! That was a bit frustrating and this receiver, along with an appropriate left-handed bolt assembly will work for the lefty just as we desire.

left-handed ar15 upper

I’ve seen quite a few AR15 based rifles in F-TR at our local club matches over the past year. This upper would be a good choice for many right-handed shooters using the AR for F-Class as it allows loading with the left hand while the right hand remains on the pistol grip and ready to fire when the target appears. In light of the fact that the bolt release is on the left side, that makes life a lot simpler than using the right hand! So if you’re a left-handed shooter or even a right-handed F-Class shooter, give this some thought, it might be just what you’ve been waiting for and didn’t even know it!

Run AR Magazines in Rem 700 Bolt Gun

$
0
0

Pacific tool and gauge ar-15 magazine bottom metalHow’d you like to run AR-15 Mags in your Rem 700 bolt gun? Sound far-fetched? Well think again. Pacific Tool and Gauge has developed a unique bottom metal system for Rem 700 short actions that works with standard AR-15 mags, providing reliable function with .223 Rem (5.56x45mm) rounds. The AR-mag compatible Rem 700 Bottom Metal costs $129.00 by itself, or $149.00 with a C-Products 10-round magazine.

The system works with straight 5-round, 10-round, and 20-round metal mags as well as larger, angled 30-round metal mags. (Because they are thicker, Magpul mags and other polymer magazines do not work with this PT&G bottom metal system.)

Pacific tool Gauge Rem 700 bottom metal ar15 ar-15 magpul magazine

At SHOT Show, Dave Kiff showed us the AR-Mag compatible bottom metal. “It took a lot of time to get the geometry just right, but we’re proud of this product”, Dave said. A PT&G exclusive, this special bottom metal as been designed to fit in all Remington 700 standard factory stocks right off the shelf with minimal inletting. This bottom metal features a handy mag release button incorporated into the side of the bottom metal (this is more reliable and secure than a mag release in the trigger guard).

Pacific tool Gauge Rem 700 bottom metal ar15 ar-15 magpul magazine

Slight Modification Required During Installation
Customers purchasing this bottom metal will need to modify their Rem 700 actions very slightly, to create a little extra clearance. The Feed Bevel (left photo) needs to be opened to 0.660″, while the mag well needs to be opened to 0.900″.

Pacific tool Gauge Rem 700 bottom metal ar15 ar-15 magpul magazine

Product tip from EdLongrange. We welcome reader submissions.

Magpul Hunter Stock- only $259.95

$
0
0

Magpul 700 stock Hunter polymer chassis system

Our readers wanted more information on the $259.95 Magpul Hunter 700 stock, so here it is. We got our hands on the new product. The polymer shell is strong and stiff — not like the “Tupperware” plastic stocks you’ll find on some factory offerings. The stock comes standard with a flush bottom plate. However, for $70 more you can get a polymer magwell unit that allows use of new MagPul 5-round and 10-round magazines. The stock features an anodized aluminum V-block that allows easy installation of a Rem 700-footprint action.

CLICK Photo to See Full-Screen Image:
Magpul 700 stock Hunter polymer chassis system

But perhaps the most important element of this stock can’t be shown in photos. INSIDE the stock is a metal “skeleton” that extends from the middle of the fore-end back into the grip. This skeleton, an important design innovation, gives the stock great strength and rigidity. It is sort of like a race car with a tube chassis under the body work. We suspect Magpul is working on a patent.

Magpul 700 stock Hunter polymer chassis system


And here is a review by writer Kip Slaton, who got his hands on one of these stocks

Magpul Rem 700 Stock Remington tactical chassis

Gear Report by Kip Staton
Magpul jumped feet-first into the bolt-action precision rifle market by dropping a teaser video of their Hunter 700 chassis/stock system. Feast your eyes on this video that shows Magpul’s new chassis system in action:

The Hunter 700 (MSRP $259.95) is built around a ruggedly anodized aluminum bedding block, and utilizes a standard Magpul SGA cheek riser and spacers (from the shotgun line). It also features forward M-LOK slots, as well as multiple points to mount swivel studs and QD sockets. Weight is a svelte 2.9 pounds, and the system is compatible with factory Remington 700 bottom metal. And that’s not all.

Magpul Rem 700 Stock Remington tactical chassis

By removing a spacer in the stock, end-users can convert the rifle to feed from the company’s new steel/polymer Bolt Action Magazine Well, which accepts standard AICS pattern magazines. MSRP for the conversion is an impressive $69.95, and that price even includes a mag. But — hold on — it gets even better (look at the photo carefully).

Magpul Rem 700 Stock Remington tactical chassis

Yup. It feeds from PMAGs. New, AICS-compatible PMAGs. The PMAG-5 7.62 AC is a fully-featured polymer magazine, with an anti-tilt follower and MSRP of $34.95. Interestingly, the magazine holds five (5) rounds to comply with hunting regulations, but the follower features a trimmable, pre-scored stop that allows users to increase capacity by a single round for other purposes.

Magpul Rem 700 Stock Remington tactical chassis

Magpul promises that this is just the beginning for their precision rifle accessory line, hinting at a larger-capacity PMAG-10 7.62 AC in the future, as well as other calibers. Anybody running AICS pattern mags (and that’s quite a few serious precision rifle guys) should be stoked about these new products.

About the Writer
Kip Staton is a freelance gun writer based in North Texas, and loves to blog about news within the firearms industry and his perceptions on marksmanship at KipStaton.com. He served as the weekend range manager of the North Texas Shooter’s Association from 2010-2012, at which point he began performing sales consultations for a major online firearms retailer. Currently, Kip is a content marketer, copywriter and digital strategist for an award-winning Dallas marketing agency.

To read more gear reviews by Kip, visit KipStaton.com.

Schmidt & Bender 5-25×56 PM II SFP Review

$
0
0

Schmidt Bender 5-25x56mm Second Focal Plane MOA riflescope scope Rifleshooter field text box gear review

Schmidt & Bender 5-25×56mm PM II SFP Review
Test conducted by RifleShooter.com
For police and military use, the Schmidt & Bender PM II Police Marksman is considered the gold standard of extreme use rifle optics. The majority of high end scopes you’ll encounter today aspire to reach its level of durability, optical clarity, repeatability and performance.

Schmidt Bender 5-25x56mm Second Focal Plane MOA riflescope scope Rifleshooter field text box gear review

The Schmidt & Bender PM II line started with the 3-12×50 in 2003. Since then, PM II models have been adopted by the U.S. Border Patrol; DEA; FBI; DOE; Tucson SWAT; Washington D.C. Police, and many others. In 2005, the 3-12×50 PM II was awarded the US Marine Corps contract for the USMC M8541 SSDS. In 2011, the 5-25×56 PM II model was awarded the PSR Day Scope contract for US Special Forces. The 3-27×56 PM II High Power was designed for, and subsequently used by, US SOCOM. The 3-20×50 PM II Ultra Short was recently selected as the day scope of choice for the weapon package for the US Army CSASS program in 2016.

Here is the Schmidt & Bender 5-25x56mm PMII SFP (foreground) alongside three other S&B products:
5-25×56 PMII FFP (Desert Tan), 12-50×56 PMII, 3-20×50 PMII

Schmidt Bender 5-25x56mm Second Focal Plane MOA riflescope scope Rifleshooter field text box gear review

While Schmidt & Bender has served the U.S. commercial market for 20 years, it has recently decided to place a hard focus on its growth and product availability. To learn more about this I reached out to Kyle Brown, Schmidt & Bender’s Director of Sales and Marketing. According to Brown, this increased attention is “because of S&B’s recent aggressive investments made to increase production while maintaining and improving quality control standards.In other words, now that S&B can produce and ship in greater quantities, S&B is concentrating much more on the U.S. market”.

In addition to increased production and availability, Schmidt and Bender has reduced retail pricing on PMII models 14-19% depending on the model. Brown commented, “S&B improved their warranty in the USA for 2017, and now offers a USA 20-Year Transferable Limited Warranty. We have reduced our pricing to be competitive; and have greatly increased our on-hand inventory levels to supply our customers with complete and on-time deliveries. While we are not yet perfect in this area, we have greatly improved, and continue to improve in this critically important area. We are continuously working on new reticle designs, elevation and windage turret designs, and rifle scope models to satisfy and reach more customers, and to increase our overall business”.

Schmidt & Bender has made an effort to support the Precision Rifle Series (PRS). Brown said, “for 2017 we have made a very hard push to become more active in PRS with our brand and with our products. We are the PRS 2017 Heavy Tactical Gas Gun sponsor. We are the 2017 PRS Club Series Title Sponsor. We are the title sponsor of the 2017 Heatstroke Open, as well as other matches pending. Also, we are sponsoring three relevant PRS teams for 2017.On top of this, we are supporting many PRS matches with products and/or $1,000.00 discount certificates”.

Schmidt & Bender loaned me a Schmidt & Bender 5-25×56 PM II SFP for testing and evaluation. SB scopes, like this one, have a wide array of available options*. The many options and features of the 5-26x56mm PM II are explained in this animated video from Schmidt & Bender:

Why Second Focal Plane (SFP) and not First Focal Plane (FFP)?
When I told my friends I was going to test a PM II in SFP, they wanted to know why. The short answer is law enforcement, long range and F-Class shooters tend to prefer SFP over FFP. For a more detailed response, let’s review First and Second Focal Plane reticles.

Second Focal Plane (SFP) Reticles
The Second Focal Plane (SFP) reticle design works well for long-range target shooters, bench rest shooters, hunters, and law enforcement. Often, SFP reticles are associated with Minute of Angle/MOA-based reticles. For target shooters who like to dial-in the elevation corrections, frequently SFP is the preferred reticle type. Also, these reticles are offered with thinner lines and markings to aid in target shooting, by not covering up as much of the target area, which is absolutely necessary in such cases as F-Class and Benchrest shooting.

SFP reticles are the most popular in the USA, and are considered non-distracting and easy to use [because the reticle lines always remain the same size/thickness in your view]. When used as a smart/intelligent reticle, the math associated with these SFP reticle designs is accurate at a single selected and stated power zoom range. Example: 5-25×56 PM II model, with a P4FL2-MOA SFP reticle, would subtend properly at 25X power setting; and if zoomed down to 12.5x power setting, the mathematical values would double. This “doubling” of the math allows the shooter to greatly extend their range and holds, and makes the SFP design a favorite with Extreme Long Range (ELR) shooting and competitions, such as “The King of 2 Miles” match.

SFP reticles are popular, friendly, and non-distracting while zooming up and down in power settings. If you like to dial-in your elevation and windage adjustments, SFP reticles are likely the preferred choice.

First Focal Plane (FFP) Reticles
The First Focal Plane (FFP) reticle design is beneficial for more dynamic settings, like true tactical long-range shooting, specific hunting applications, and Precision Rifle Series (PRS) competition. Consider FFP ideal for situations where the power zoom range is constantly being adjusted, the target distances vary greatly in short periods of time, and where targets are moving. Typically, FFP reticles are associated with Milliradian/Mil/MRAD-based reticles; however, sometimes these also apply to MOA-based reticles as well.

When used as a smart reticle, the math associated with these FFP reticle designs is accurate/relevant at any given or selected power range. Example: 5-25×56 PM II model, with P4FL FFP reticle, would subtend properly at any power zoom range setting between 5x and 25x power; and the MRAD mathematical hold values would be true and accurate at any of these power/magnification settings.

FFP reticles can be a bit distracting at first, as the shooter zooms up and down in power settings. The most common complaint is the issue where, when zoomed down to the rifle scope’s lowest power setting, the intelligent reticle can quickly looked cluttered and undefined. This is where reticle illumination becomes very important in regards to intelligent FFP reticle designs. It is often the case that FFP reticle lines and markings are much thicker than their SFP counterparts; but this is improving with newer FFP reticle design technology.

FFP reticles are becoming more and more popular in various applications, and are the absolute preferred reticle types in today’s Special Forces branches of the military and in Precision Rifle Series (PRS) competition shooting. If you like to use the reticle to compensate for elevation corrections and windage holds, regardless of power settings, for various shooting distances and conditions, FFP reticles are fast, accurate, and are indeed the preferred choice.

This Schmidt & Bender catalog page shows reticle options for the 5-25×56 PM II.

Schmidt Bender 5-25x56mm Second Focal Plane MOA riflescope scope Rifleshooter field text box gear review
Click image to zoom.

5-25x56mm PM II Scope Review

Our test scope is a 5-25×56 PM II (SKU: 677-911-995-A8-A2) with a Second Focal Plane (SFP) P4FL2-MOA reticle; double-turn elevation with rotation indicator; single turn windage; .250 MOA click values; illuminated reticle; and side adjustable parallax from 10 meters to infinity. This is an impressive beast — a big, sturdy, well-made optic.

Here is the P4FL2-MOA reticle. Hash marks give MOA-based values at 25 power:

Schmidt Bender 5-25x56mm Second Focal Plane MOA riflescope scope Rifleshooter field text box gear review

Schmidt Bender 5-25x56mm Second Focal Plane MOA riflescope scope Rifleshooter field text box gear review

On the right side of the optic, you’ll notice a .250 MOA single turn windage adjustment knob. On the top you’ll note the .250 MOA elevation adjustments. The tactile feel of each “click” is impressive, crisp and precise; it gives the shooter positive feedback.

Schmidt Bender 5-25x56mm Second Focal Plane MOA riflescope scope Rifleshooter field text box gear review

A large parallax knob is located on the left side of the turret. Note it is adjustable from 10 meters to infinity for a crystal-clear picture. The smaller knob located closer to the eyepiece is the adjustment knob for the illuminated reticle.

Schmidt Bender 5-25x56mm Second Focal Plane MOA riflescope scope Rifleshooter field text box gear review

Here the view from behind the scope. Note the DT (double turn) elevation turret. At its current setting in the photo above, it is still on the first revolution (.250 MOA below 0) and as adjustments within the first revolution are made, you’d read the white numbers.

Schmidt Bender 5-25x56mm Second Focal Plane MOA riflescope scope Rifleshooter field text box gear review

During the second revolution, the windows in the top of the turret turn yellow. This indicates the scope is on the second revolution and the shooter should read the yellow numbers; in this case, 50.25 MOA. This feature helps prevent the shooter from getting lost in the turret if he has a long range setting dialed in and forgets how far away from zero he was.

For testing and evaluation purposes I decided to mount the PM II on a custom made .300 Winchester Magnum rifle. A heavy-duty scope like the PM II needs a proper set of rings to mount it to the rifle. I’ve found the Spuhr ISMS to be my scope mount of choice.

This is the test rifle I used. It was built primarily with parts from Brownells. The rifle includes:

  • Stiller action
  • Accuracy International AICS AX Chassis
  • Shilen Select Match barrel, #7 1:10″ twist
  • Badger Ordnance FTE brake
  • Spuhr ISMS mount
  • Jewel HVR trigger
  • Aimpoint T1 micro sight
  • Sierra 7 bipod
  • Schmidt Bender 5-25x56mm Second Focal Plane MOA riflescope scope Rifleshooter field text box gear review

    Schmidt Bender 5-25x56mm Second Focal Plane MOA riflescope scope Rifleshooter field text box gear review
    To learn more about how I built this rifle, please see Building a .300 Winchester Magnum Precision Rifle.

    Schmidt Bender 5-25x56mm Second Focal Plane MOA riflescope scope Rifleshooter field text box gear reviewThe barrel on this rifle is 24″ long, fairly short for a .300 Win Mag — especially for the heavier bullets. To see how barrel length affects velocity in the 300 Win Mag, take a look at 300 Winchester Magnum: How Does Barrel Length Change Velocity — A 16″ .300 Win Mag? for an empirical data set we gathered on a match grade barrel. While you are at it, if you want a good laugh, take a quick peek at Does size matter? Custom Remington 700 16.5″ 300 Winchester Magnum follow up.

    Ammo Used in Test
    At right is .300 Win Mag ammo with my pet load: Sierra’s 195-grain Tipped MatchKing over Norma brass and Hodgdon H4831SC powder.

    Zeroing This Optic Is Easy
    Zeroing the PM II was a breeze. The zero stop and turret settings are controlled by set screws. There isn’t a lot of thought involved. You don’t have to move caps, insert shims, move clutch mechanisms, and so on. Simply loosen the screws, swing the turret back to “0” and you are all set. To establish a 100-yard zero, I hung a target at 50 yards, fired one round, dialed a correction, fired a confirmation shot and moved back to 100 yards. I fired one round at 100, made a correction and was zeroed. That’s it, three rounds, done.

    Tall Target and Box Tests

    To get an idea of how the PM II tracked I wanted to conduct a tall target and box test. I set up a couple of ISPC targets at 100 yards (below).

    Schmidt Bender 5-25x56mm Second Focal Plane MOA riflescope scope Rifleshooter field text box gear review

    The target on the left is for the tall ladder test, the target at the right is for the box test.

    With the scope zeroed I set up a tall target test at 100 yards. I placed a 1″ orange dot on a pair of targets (above, left). I then used a four foot level to draw a plum line moving up from the dot and fired the three shot group below.

    Schmidt Bender 5-25x56mm Second Focal Plane MOA riflescope scope Rifleshooter field text box gear review

    I dialed 30 MOA of elevation on the scope and fired another group. Measuring the distance between the two groups, would indicate how well the scope is tracking.

    Schmidt Bender 5-25x56mm Second Focal Plane MOA riflescope scope Rifleshooter field text box gear review

    Since 1 MOA is 1.047″ at 100 yards.30 MOA would be 31.41″ (30 x 1.047″= 31.41″), looking at my tape measure, everything checked out (above).

    Next I conducted a quick box test and set up an IPSC target with a orange paster at 100 yards. To do this I first fired one round with the scope zeroed, then…

    Dialed 6 MOA left, fired one round
    Dialed 15 MOA up, fired one round
    Dialed 6 MOA right, fired one round
    Dialed 6 MOA right, fired one round
    Dialed 15 MOA down, fired one round
    Dialed 6 MOA left and fired one round

    After this, you want to see two holes close to each other on the first target, as well as the correct spacing dialed in between each hole, so how did the PM II do?

    Schmidt Bender 5-25x56mm Second Focal Plane MOA riflescope scope Rifleshooter field text box gear review

    Well, it worked like a champ! The rest of my time with the PM II has been equally impressive.

    SUMMARY: This is a Superb Scope

    These are my thoughts on the Schmidt & Bender PM II 5-25×56 SFP:

    • It’s a lot of scope. The PM II is pretty much the best scope you’ll be able to buy anywhere in the world. There is a reason they are in such widespread Military and Law Enforcement use, it has earned its reputation.
    • Great zero stop. The PM II has the easiest-to-adjust turret and zero stop system I have ever used. On the PM II, the zero stop feature is known as a Sub Zero Stop. The Sub Zero Stop allows movement below zero On the test scope it was 1.75 MOA. This is a great feature if you switch ammunition or elevation and need to bump your zero down.
    • Tracks well. This was to be expected with its widespread use by military units throughout the world.
    • Crisp, precise adjustments. The tactile feel of the knobs is exceptional.
    • Crystal clear glass. Great light transmission and reticle.
    • SFP isn’t dead! I have a mix of MIL and MOA optics, both FFP and SFP. I use them all for different purposes. The SFP scope is far from dead, especially for Law Enforcement, long range and F-Class use.

    My credit card is smoldering…

    To learn more about Schmidt & Bender optics, CLICK HERE.


    *Here is a glossary of Schmidt & Bender’s turret and reticle options:

    DT: Double Turn elevation turret – with 2nd rotation visual indicator
    ST: Single Turn windage turret
    DT-MTC-L: Double Turn elevation turret, with More Tactile Clicks, and with Locking feature – with visual and tactile 2nd rotation indicator
    ST-MTC-L: Single Turn elevation turret, with More Tactile Clicks, and with Locking feature
    Reticles SFP: Three unique Second Focal Plane reticles (Promoted for 2017)
    P3L: Illuminated Mil-Dot reticle – Mil- Based
    P4FL: Illuminated Graduated Fine Line reticle – Mil-Based
    P4FL2-MOA: Illuminated Intelligent Graduated Fine Line Reticle – MOA-Based
    Reticle FFP: Six unique First Focal Plane reticles: (Promoted for 2017)
    H2CMR: Illuminated Hybrid Reticle – Mil-Based
    P3L: Illuminated Mil-Dot reticle – Mil-Based
    P4FL: Illuminated Graduated Fine Line reticle – Mil-Based
    MSR: Illuminated Hybrid Graduated reticle – with ranging and measuring tables – Mil-Based
    H59: Horus specialty reticle
    TReMoR3: Horus specialty reticle
    LRR-MIL: Pending New – Illuminated center dot – Intelligent Graduated Fine Line Reticle: Mil-Based with .1, .2, .5, and whole Mil indicators

    Viewing all 19 articles
    Browse latest View live